Showing posts with label kids. Show all posts

Wednesday, March 12, 2014

Around Here

The camera batteries died and I refuse to buy more when I know that the charger for them is somewhere in the mess I call my room. So, I have no "proof" of what we've been up to, you'll just have to take my word for it.

I finished a sweater for Stomper's Build-A-Bear puppy he named Charlie. His response: "No like it Mommy. Too little." Which it wasn't, the sweater was actually a little too big. It looks really cute on Charlie, but Stomper doesn't like it. (As I was writing this he came downstairs with Charlie and the sweater and told me that Charlie was cold and asked that I put it on. Made this Mommy very happy)


Finished a sweater for Our Sweetie too. A small shrug for this spring and summer. It's very cute. I don't really like the yarn though. It's knit picks swish and find that the yarn is too stretchy. It doesn't make a firm fabric. I'm trying out Cascade 220 sport weight to see if I like that better.

For Easter I am making Stomper and Our Sweetie Milo vests. His will be blue and hers will be green. I have wanted to make this vest for a long time and I am very excited. I am also going to be starting a test knit soon, not sure how much I will be allowed to tell you about it. The test knit is something for me.

Our Sweetie just keep growing! It's hard to believe that she's five months already! Still no word on how long we will have her. We have been greatly enjoying all the smiles and belly laughs she gives us.

Stomper is a great big brother and wants to help more than he is able. He likes listening to music, dancing, reading, and playing with his new Jake and the Neverland Pirates "Tree House" that he bought with his own money. He had some Christmas money and a piggy bank full of change that he has been collecting off of Jason. When we took it to the bank to have it counted I thought it would be $20.00 or so. Nope. He had over $40.00 saved up (he had been saving for over a year) so he was able to buy the "Tree House" and two packages of friends. He's been playing with it every day for a week, so it was a good purchase for him.
We have a busy week-end ahead of us. We have an open house at the farm and hopefully some sap boiling. Before the open house we are going to get dumped on with about a foot of snow. Should make things interesting. My parents will be picking up a few chicks (assuming they come in to Tractor Supply) to have for the open house. They will be living in our part of the house until the coop is free. Should prove to be interesting.

I've been hit with a cold and/or allergies. Either way I find myself sitting down with my "Dragon" often to receive nebulizer treatments. Which means that I've been reading quite a bit. I just finished off Unsouled. I don't like how the author left the book, it wraps everything up in a bow, but one that could open up a whole new book. I hope he writes another one. As soon as I can get to the library I will be finishing the Maze Runner series. After that I don't know what to read. 


Other than pining for green grass that's what we've been up to.


Saturday, March 8, 2014

Hamberg Family Farm Open House


March 15 11am-4pm
Hamberg Family Farm Open House

* Bonfire * 
* Sap Boiling * 
* Coop Tours *

Bring the whole Family

Come and learn how we feed and handle our poultry. Tour our coop and discover why small scale flocks produce better tasting meat and eggs. 

Taste test the difference! We will be making soup out of a store chicken and one from our farm.

We have a big back yard to play in, so bring your snow gear kids!

Reserve Whole Chickens (ready early summer) and Fall Turkeys with deposit. For more information contact us through facebook: Hambergfamilyfarm

Thursday, August 29, 2013

Making


Last School year we had a good behavior chart and when we had the kiddos choose a few rewards to earn. One of the rewards the daycare kiddos was to make their own stuffed animal. The inspiration we received for this craft was this photo from Martha Stewart. At the end of the school year, before we shut down for the summer, we told them that when they came back they could make their very own stuffed animal.

The original plan was to use some remnant fabric that Mom had scattered about the farm house. However, when she emptied part of the attic to reduce the amount of clutter up there, she found a bunch of felt. Since felt doesn't need to be hemmed we decided to use it instead of fabric with the kids.

On Tuesday I sat them down and explained the plan. They set to work and by Tuesday afternoon we were cutting out pieces and pining them together. Wednesday after our walk they attached details. One of the kiddos completely finished his project and another had to wait for glue to dry. Today most of them are stuffed and ready to go home. I am really impressed and proud of them. They have worked hard, carefully, and inventively. They have stuck worked on it for days and even when their attention waned. I think we will be seeing more projects like this in our future.

Our creations:
Pokemon Ball with Haunter
Pokemon Ball with Pikachu
Ice Cream Cone
Octopus
Butterfly
The only limit is your imagination!

Materials:
Felt of different colors
Needle
Floss of different colors
Bits and Bobs: buttons, beads, bells, rick-rack, ribbon, pipe cleaners, lace, ribbon, ect

Liquid Stitch


Step 1:
Draw or sketch out your idea. The only limit is your imagination. One kiddo wanted to make a cube, than a ball, but we asked him to alter his plan to a pillow shape which he was able to make.

Step 2:
Create pattern pieces. We had them finalize the sketch to the proper size and then using the printer/scanner I photo copied it so that we would have two exact pieces.

Step 3:
Cut and pin. Cut out all your pattern pieces and attach them to felt or fabric.

Step 4:
Cut out pieces and pin together. Remember that if you are using felt you do not have to put wrong sides together. You can stitch it and see the stitches and it will look great. For arms and legs or other appendages we stitched them to the inside before putting our main pieces together. Start with your details first so that your knots are all easily concealed on the inside.

Step 5:
Attach details: arms, legs, extra bits to make it special, to the main body.

Step 6:
Attach back and front of main body to complete stuffie. Leave a hole to push stuffing into.

Step 7:
Stuff

Step 8:
Sew up any remaining holes and you’re done.

We are doing this project with a kindergartner. She needs a lot of help, but is able to do a lot of the stitching herself.

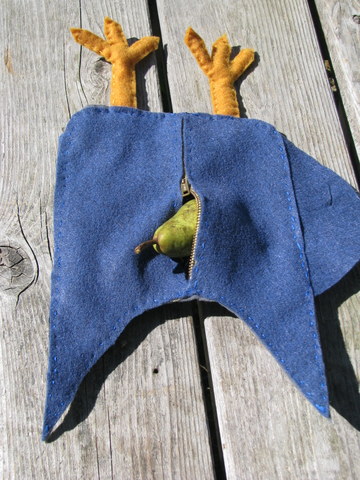
I did this project for Stomper but added some "skill trainers" in the form of two buttons for him to practice with and a zipper on the back so he could use it as a secret pocket for hiding special things in. I considered adding some shoelaces to practice tying, but he's still a little small for tying.


Thursday, March 7, 2013

Today Outside


Mommy Ninja
wearing :: Slouchy Beret and Mira's Cowl

The next series of pictures is what happens when you challenge a two year old, a three year old, and a four year old to squeeze into a mostly buried cozy coupe.


Popular Posts

Related Posts Plugin for WordPress, Blogger...