Monday, August 30, 2010

Winnie's Dress


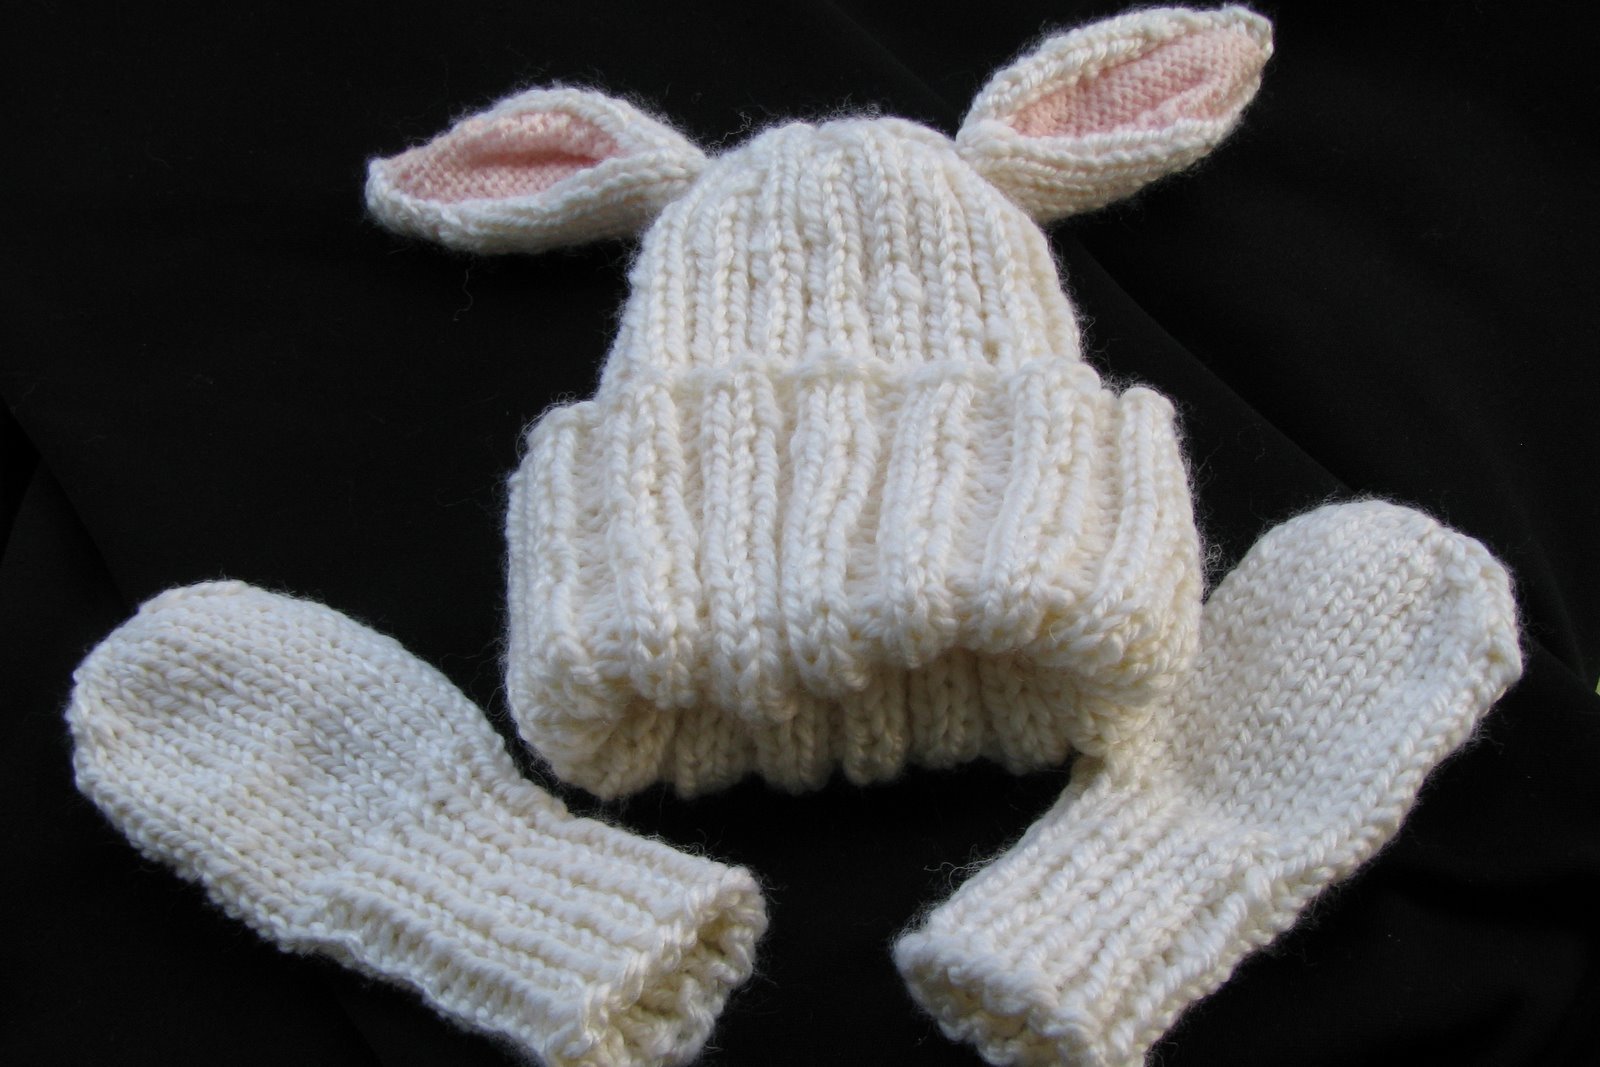
I created this dress to go with the Nursery Baby Doll you will need to purchase their pattern for the doll first. If you click on the link you will find ordering instructions, the pattern for the doll, a bunny suit, a bunny  hat, and booties is $5.00. (The doll is super cute and quick to knit up)

The dress is knit from the bottom up. You will need basic skills: knit stitch, purl stitch, and simple decreasing. Please be sure to check your gauge. I know it's a hassle, but I tend to knit a little loose. I wouldn't want you to come to the end of the project and find that the dress was too big. The dress is plain (other than the ruffle) and easily adapted. You could add stripes or some intarsia. I added a little flower embroidery at the end, but you could just as easily add buttons or other embellishments, have fun with it! I didn't include any buttons up the back in mine, because I designed this for a child under 3 and buttons can be choking hazards. That doesn't mean you couldn't if you wanted too. Please contact me if you have any concerns, confusions, or comments!


(Oct 2012-If you are using a different sized needles than the pattern calls for go up 1 or 2 needle sizes to knit the dress. For example: I have knit the doll with size 5 needles and her clothes with size 6 and adjust the length of the dress by trying it on the doll.)

Dress

Notions and Notes:
baby weight/sport weight/dk weight yarn (it's marked 3 on the label)
size 4 needles
sewing needle
bits of yarn to embroider a flower to the dress

gauge 6 stitches by 7 rows equals 1 inch

Cast on 91 St

Ruffle

  1. k3, *p5, k3* (WS)
  2. p3, *k5, p3*
  3. k3, *p5, k3*
  4. p3, *k1, slip 1, k2tog, psso, k1, p3*
  5. k3,* p3, k3*
  6. p3, *k3, p3*
  7. k3, *p3, k3*
  8. p3 *slip 1, k2tog, psso, p3* (44 st)
  9. k3 *p1, k3*
  10. p3 *k1, p3*
  11. as 9th row

knit across all stitches (RS)
continue in stockinette (knit RS rows and purl WS rows)  stitch until piece measures 2 1/2 inches from cast on edge.

Decrease

  • k1, k2tog, k17, k2tog, knit to last 2 stitches k2tog, k1
  • st st 3 rows
  • (RS) k1, k2tog, k to last 3 stitches, k2tog, k1
  • st st 3 rows
  • (RS) k1, k2tog, k to last 3 stitches, k2tog, k1 (40 st)


continue in stockinette stitch until pieces measure 4 inches from cast on edge

Shoulder 1
k 10
Turn the work leaving the other 30 stitches on the other needle. Now just work with the 10 stitches
work in garter stitch (knit every row) for 14 rows ending after knitting a WS.
Bind Off

Front
Rejoin yarn on the RS
k 20
Turn the work leaving the other 10 stitches on the other needle. Knit in garter stitch (knit every row) for 10 rows ending after knitting a WS.
With RS facing you k6, k2tog, k2tog , turn work
(8 st) knit
k4, k2tog, k2tog
k
Bind off

Rejoin yarn with RS facing you. Work the left side of the front
(RS) k2tog, k2tog, k6
(8st) k
sew 3 inches
k2tog, k2tog, k4
k
Bind off

Shoulder 2
Work as shoulder 1 and bind off

Finishing
Sew the tops of the shoulders together. There will be extra stitches at the back.
Sew the two halves together for no more than 3 inches.
Embroider something cute on the front if you desire.

Abbreviations:
k - knit
p - purl
slip 1, k2tog, psso = slip the next stitch knit wise, knit the next two together, and then lift the slipped stitch up and over the k2tog and off the needle
st - stitches
st st - stockinette stitch (knit the RS and purl the WS)
WS - wrong side or the back side of the work
RS - right side or the front of the work
*  * - repeat

Friday, August 27, 2010

Mom's Shrug

I asked my Mom what she would like me to knit for her. She said, "Something to wear in church to keep my arms warm". To which I answered, "Like a sweater?" she said, "No a sweater is too hard to get off and on, how about one of those shrug things you made for your brides maids?" I said, "Sure Mom, anything for you!"

And thus Chilly Church Shrug was born.

I bought yarn in the color she wanted, made some measurements, a few swatches, asked her about how warm she wanted it, and cast on. Two inches in I realized that I had not cast on enough, it wasn't going to be big enough across the back. Not to worry, I doubled the stitches and pretended that I meant to do that and got into the block pattern I had seen on another blog

It quickly became a labor of love. I am easily bored (I have knitters ADD) and the monotony of the pattern really got to me. I kept putting it down. 

It is finished, finally, and she is ecstatic! Today I gave it to her and we found all sort of uses for it. Like: when it is worn backwards it makes a good mini-snuggy blanket and it can be used as a hood when you put your face in the arm hole.

She is taking it this week-end on her and Dad's anniversary getaway. 

I am glad that she loves it and I am glad that it is finished!
Close-up of the block pattern


Chilly Church Shrug

(August 2013 -- in bold I have added some clarification notes)

Shrug Pattern

Needles size 9 & 11
Worsted Weight Yarn (4 Skeins)

CO 60 St with size 9 needles
k2 p2 rib for 2 inches
k 1 row size 9
p 1 row size 11
increase in every stitch using your favorite increase (double the stitches)

Block Pattern 
(8 Row Repeat of 6 stitches)
Rows 1 & 3: p2, k4
All EVEN rows purl
Rows 5 & 7: k3 *p2, k4* until the last 3 stitches, p2, k1


Continue in pattern until piece measures 35 inches from CO edge

Row 1: k across entire row in size 11 needles
Row 2: switch to size 9 needles and p across entire row
Row 3: k2tog across entire row
Row 4: p across entire row

Rib for 2 inches (k2, p2)

BO in pattern

Finishing:
Sew first 6 inches of either side together to form sleeves.

Abbreviations:
CO - Cast On
k -knit
p - purl
*  * - repeat
k2tog - knit the next two stitches together as one stitch
st -stitch(es)

Wednesday, August 25, 2010

The Shrug That Kept Going ..

Mom's shrug is coming along. I am so close that I can taste it! I seriously only have a few inches left! I think I will hyper focus on it this week, after I finish stitching up some surprises for my cousins! 
Here are my notes from Raverly. I hope to post the pattern this week-end

"My Mom asked for a shawl with sleeves that she could easily take off and on. The block pattern in the main body of the shrug could be modified to any knit/purl pattern or a lace pattern.
6/14/2010 

I have run out of yarn for the moment. I hope to buy some this week-end so that I can get back on it! 

7/10/10 
Bought yarn and I’m back to pecking away at it. It gets a little boring.
8/14/10 

I am nearing the end. I am not enjoying knitting this, it’s so boring, there’s no challenge. I am looking forward to the finished product. Hope to be done this month!

8/27/10 

Looks like I will accomplish my goal! I have two inches left to knit and then a little bit of sewing!"


Thursday, August 19, 2010

Winnie

She is done and wearing her first outfit. I plan on making a dress too. The butterfly is off of Spud and Chloe's Blog. I turned the outfit around because I talked to a little girl at daycare and she thought putting the butterfly on the front (instead of no butterfly) was the best idea. The booties are not knit quite long enough (I short changed the cuff) but the little ties keep them on good. I am going to write down all my bright ideas to improve the clothes a little and knit another outfit for the second doll. First though I have some promises to keep, mostly two Rocket Ships for some awesome boys at the daycare and of course finishing up that foolish shrug I've been avoiding.


Posted by Picasa

Closer


I am this *   *  close to finishing the dolls clothes. There are some changes I am going to make with the next outfit (I'm planning at least 4 total - two for each doll). I have sleeve, and embellishment, and a pair of boots to make and then I'll be done. I am hoping to post some pictures this week-end of the finished product. For now, this will have to do ....


Click on the pic to make it larger

More Handy Me Downs

One of the parents from the daycare I work at gave me a few more items this week. I have now added:


  • swing (it folds up small)
  • walker
  • clothes for a pre-school boy
The spare bedroom is becoming quite full! I am going to need to buckle down and get it cleaned out fast!

Sunday, August 15, 2010

Clothes Failure


Close, but not close enough. I knitted up the clothes for the doll (took me most of the afternoon, with some interruptions) only to finish and discover they were too big! Ugh! So now I'm am re-knitting them on smaller needles to see if that helps. They were almost the right size but almost only counts with two things: horseshoes and hand grenades ... sigh

First Pics of Dolls

Here are the fist pictures of the doll. As you can see she doesn't have any clothes on yet. I am working on some clothes for her. I am going to make a one piece suit (like pj's) and a dress for each doll (at least). I think I will attempt to knit some sort of headband so that she looks more like a girl. Maybe wearing the pink clothes I am making will help. Right now she is looking a little tom-boyish.
I may knit a mini-wardrobe, I'm going to ask the Mom to see if her girls can handle a lot of clothes. I think I'll also make a blanket for each doll out of some scrap pieces of crocheted squares our Grammie left behind. 

Saturday, August 14, 2010

Baby Dolls & A Crown

I started the baby dolls today. I have knit up a head and a body. I think that the yarn I am using is a little too white. We'll see. The two parts I knit today knit up really fast. I should have this project done in no time.

I finished one of the crowns for the princesses. I knit too loose (I knew better than to use the suggested needles) and it's big enough to fit me. She wore it today at daycare and didn't seem to mind. I started the second one this evening. Tomorrow I hope to get all but the points done before I start in again on the doll.

The boys put in an order for some rocket ships, which should take too long. I hope to have the crowns and the ships done quickly! August was supposed to be finish up month, we'll see.

I have at least 3 hat orders for December. I think I'm going to put a "cap" on the orders. I think 10 shouldn't be too much to handle.

Thursday, August 12, 2010

Pretty in Pink

I'm trying to decide which color to use in a new Butterfly Beanie hat.

#1 
#2
#3

#1 & #2 are Baby Yarns and #3 is the regular yarn all three are from Vanna's Choice Yarns. (The baby yarns are slightly softer)

Wednesday, August 11, 2010

Update

A lot of people have been asking me how things are going with the Foster Parenting and so here it is.

We have completed our class work (24 hours worth) and completed our homework. I hope to pop the homework in the mail tomorrow.

We have completed our Home Study (which is incorrectly named) and the Fire Marshal has visited the house.

Left to do:

  • Install two egress windows (one in each bedroom)
  • Install hard wired fire alarms (four of them)
  • fix the handrail 
  • create a handrail
  • get finger printed

If everything goes smoothly I think we should have a little one by mid-October.
The Home Study lady told us that infants are few and far between but I don't believe her. We are going to start with infants and work our way up to older kids (at least that is the plan for now).

About Adoption:
Should we take in a child/infant that becomes available for adoption we have the choice to go ahead and adopt. Or (if we decide to go this route) we can look through their book of available children and start the process that way. For now we are just going to do Fostering and see where it leads.

Gathering Items

I have been busy collecting items for our future Foster Children.
Mostly I have been collecting baby items.

I have only spent $90.00
We have:

  • highchair
  • stroller/carseat combo
  • most of a wardrobe for a girl from the ages 0 - 6
  • all of a wardrobe for a girl from the ages 6-18 months
  • crib (no mattress)
  • bassinet
  • johnny jump-up
  • seat for in the tub


Most of the things are handy me downs. The things that Jason and I purchased were the furniture.

My Mom said to me: "I wonder if this means that you're going to get a baby girl?"
I said: "I feel bad for the baby boy if that is what we get."

Boy or girl we will love them!

I am selling some of my knitted things (Delia's Knitted Things) in hopes to get enough money to buy an Ergo Baby Carrier. I like the carrier over a sling or other back pack because of the way that it protects a babies hips. Also it is easier to have a grandparent use than the sling. I may still get a sling to try it out, we'll see.

Monday, August 9, 2010

Bunny Ears Hat & Mitts

Phew, finished. I had some issues getting the size right for the mitts and in the end I talked to the person receiving the mitts and she assured me that if they were to big it would be all right. I do believe that I have all the kinks worked out and the next pair I make in this size yarn will come out just right!
Posted by Picasa

Sunday, August 8, 2010

Dolls for Cousins


I am so excited. I just bought the pattern to make these super cute dolls! My cousin asked if I could make her girls something knit from our grandmothers yarn and asked for some turtles. Well, I'm a little tired of making turtles so I am going to make some dolls instead. This way too I get to be a bit creative when I make the dolls some clothes. I need to finish up my other projects, mainly a mitten to go with a Bunny Ears that I sold, and then some crowns I promised the princesses at the daycare I work at. I'm hoping next month will be doll month. I don't think it is going to take long to knit the dolls up. The pattern seems pretty straight forward and easy to follow! I'll keep you posted!

Tuesday, August 3, 2010

Bunny Ears Pattern

I cannot take full credit for this pattern.
I married two patterns to get this hat.

Edit April 2004
The link to the original Little Boy Blue Hat is no longer working. You can find a different version by the same knitter using larger needles and yarn on Raverly. Just switch out the yarn and needles for the ones mentioned in the Little Boy Blue Hat Rav page. I believe the pattern calls to knit for 5-7 inches before starting the increase. I would err on the side of long since you will be planning on folding it.

Hat: Pattern & find it on Raverly
Ears: Pattern & find it on Raverly
Read through both patterns before reading how I made the ears.

This is what I changed-
Hat: I used a chunky yarn for the hat (Patons Beehive Shetland Chunky) and sized 8 needles and knit for 8inches before working the decreases.
Ears: I used the same yarn and size 7 needles

I altered the ear pattern quite a bit so I am going to write it down how I made it.

Yarns: Chunky in white and DK in pink
You will need to form three small balls (2 white and 1 pink). When you switch colors twist them once around each other. (Intarsia Knitting)

With size 7 needles, CO 7 white, 10 pink, and 7 white (leave 6 inch tails when you cast on, you will use the extra later)
Row 1) knit 7 (white), purl 10 (pink), knit 7 (white)
Row 2) purl 7 (white), knit 10 (pink), pulr 1 (white)
Repeat Rows 1 & 2 until you have completed 14 rows. If you want longer ears repeat more, but always end on Row 2

Decrease
Row 1) knit to last two stitches, k2 tog, p2tog, purl to last two pinks, p2tog, k2tog, knit to end
Row 2) purl the white stitches and knit the pink stitches
Repeat Rows 1 & 2 until you have 5 stitches left 2 white, 1 pink, 2 white
Cut a 6 inch tail (of white) and thread through remaining 5 stitches and pull tight. Weave in loose ends (tie them if you want to, I do sometimes) at the top of the ears - NOT the 6 inch tails from the cast on or the one used to pull the ear tight.

Using the white from closing up the ear mattress stitch the two sides of the ear together.
Using the pink cast on tail whip stitch the pink part down by the cast on edge, be careful to not go all the way through the ear you don't want to see any pink on the other side of the ear.
Fold the ear in half and using a white cast on tail sew the bottom together.
Attach the ear to the hat using the final cast on tail of white.
My ears are approximately 3 inches apart. You might want them further or closer apart. (The first hat I made the ears were too close together and it looked more like antenea not ears.)

Abbreviations:
k2tog - knit the next two stitches as one
p2tog - purl the next two stitches as one
CO - cast on

This hat on a 16month old
This hat on a 5year old

Monday, August 2, 2010

"Bunny Ears"

Here is the finished product of the new and improved "Bunny Ears". I changed several things but what made the most difference was the quality of the yarn. The yarn is luxurious and soft! I think I will be buying a skein or more for myself to make a scarf and hat. I attached the ears further apart so that when it is stretched while on someones the head the ears look like ears and not antennae. This is a unisex hat, however the boys at the daycare refused to wear it. That might have more to do with the temperature outside then their feelings toward the hat, I hope. The little girls who tried it on for me didn't seem to mind wearing it. The older one felt a little silly with it on, but I think she enjoyed the attention! ;)


Posted by Picasa

"Bunny Ears" Photo Shoot 2


Big sister and little sister can wear the same hat!

Posted by Picasa

"Bunny Ears" Photo Shoot 1


"Please, no more photos!"
Posted by Picasa

Sunday, August 1, 2010

Lazy

 Feeling a little lazy today. I've got a lot on my plate. I really want to skip over my current project and scoot ahead to the next, but I've made promises and deadlines. Here I go, up off the internet and back to the needles!

Popular Posts

Related Posts Plugin for WordPress, Blogger...